アカウント開設方法
~Account opening method~
日本語対応をしておりません。中国語・英語・韓国語から言語の選択をします。
Because we do not correspond to Japanese, we will choose the language from Chinese / English / Korean.
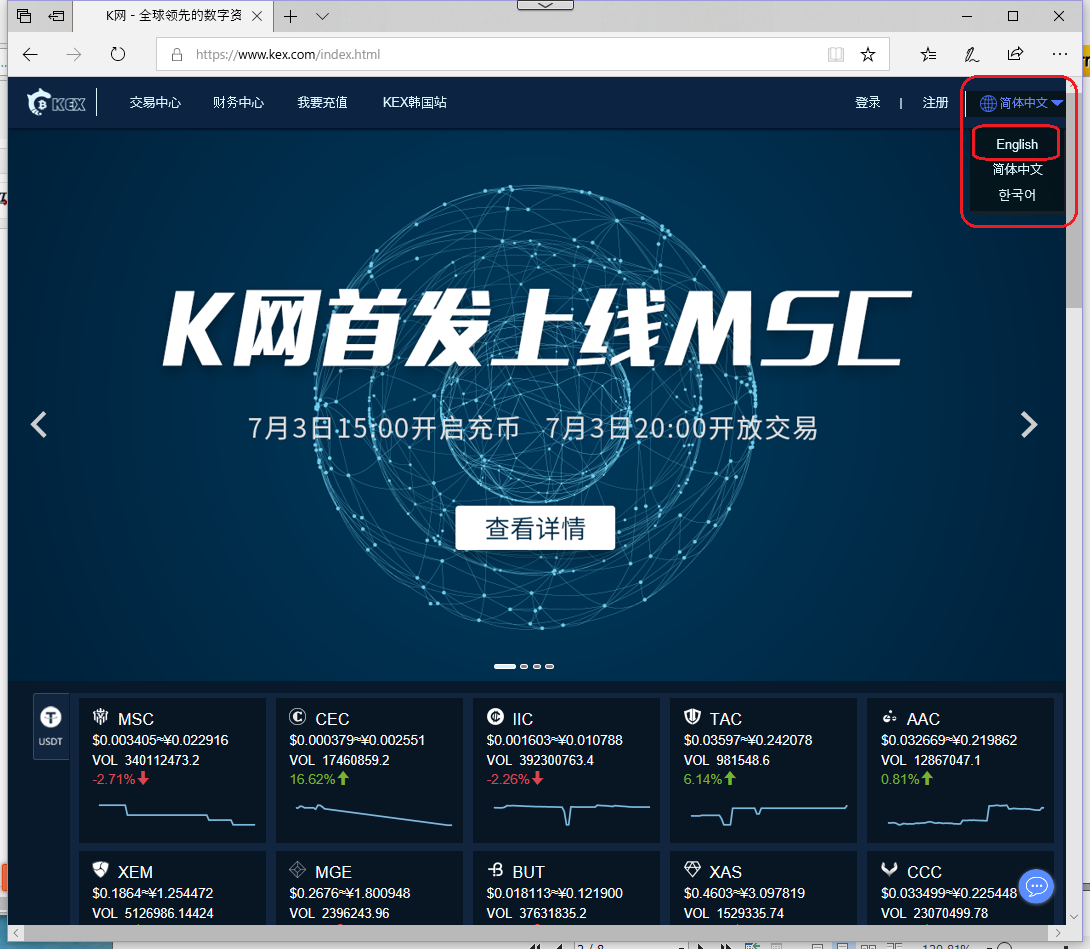 ①画面右上赤枠から英語を選択
Select English from the red frame on the upper right of the screen.
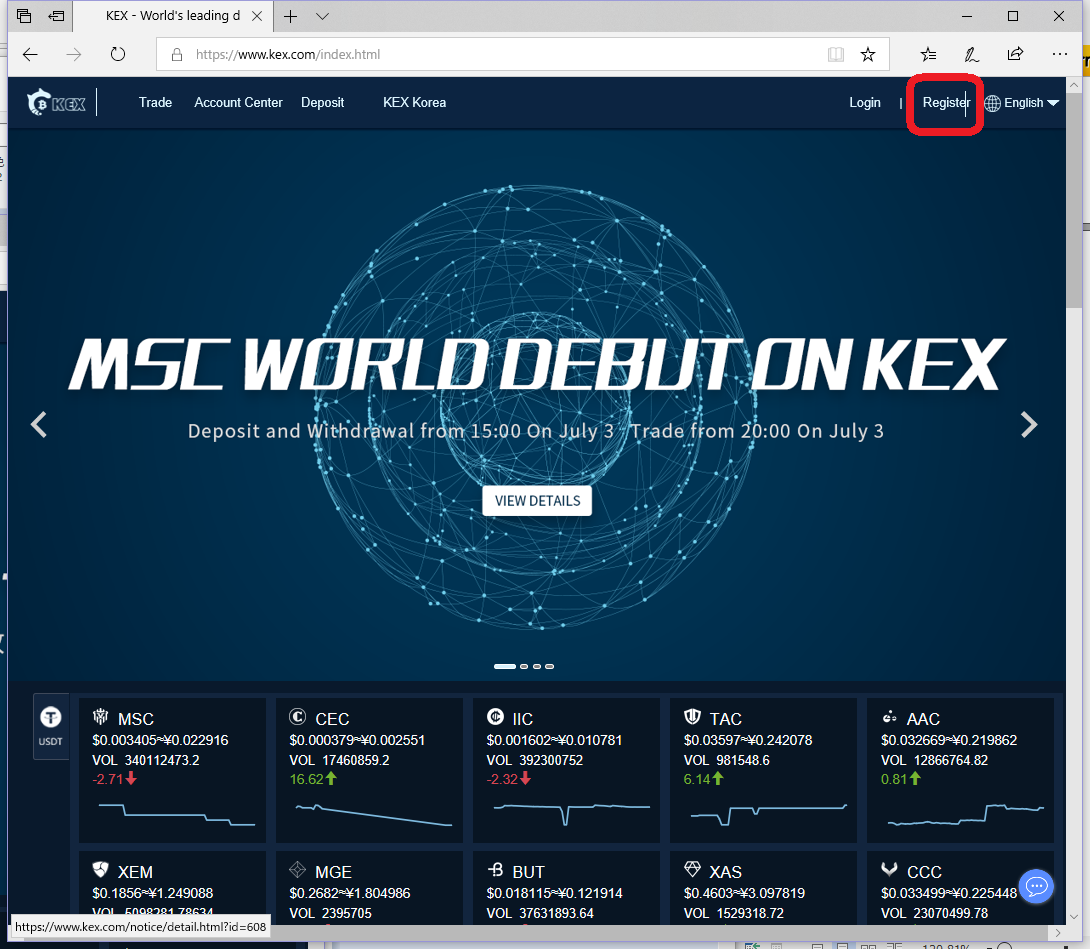
②赤枠「Register」をクリック
登録方法は以下の2パターン
Click the frame "Register".The registration method is the following two patterns.
・携帯電話番号の認証
・E-mailアドレスの認証
・The registration method is the following two patterns.
・E-mail address authentication
アカウント開設後、取引を行う際に携帯番号・E-mailアドレスの認証が必要となるのでどちらから登録を行っても問題はありません。
今回は携帯電話番号認証でご説明します
※SMS認証を受け取るのでモバイル電話の準備が必要となります
After opening the account, you need to authenticate your mobile number and E-mail address when you do business, so there is no problem if you register from either.
I will explain with cellular phone number authentication this time.
※Because we receive SMS certification we need to prepare mobile phone
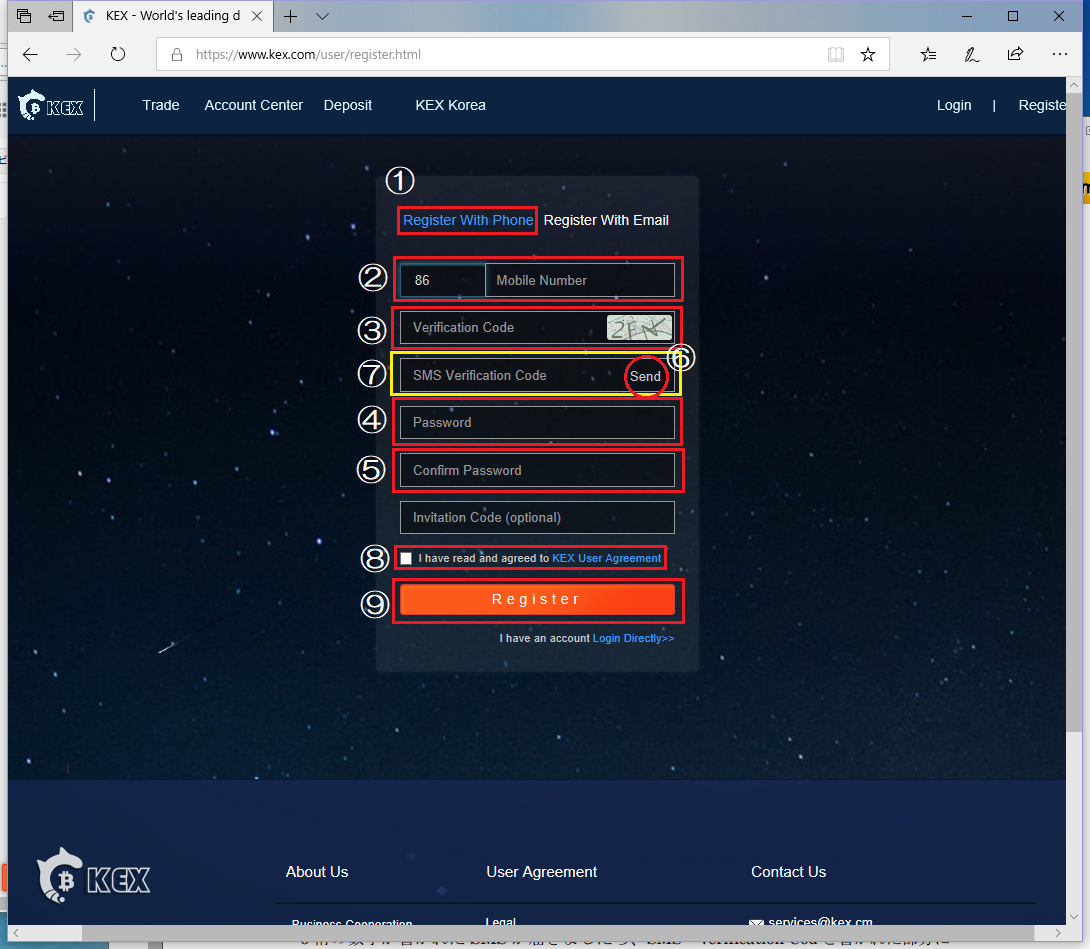
③項目を入力します。Enter the item.
1.「Register With Phone」を選択
2.国コード「日本の場合は0081」を選択し、携帯電話番号を入力
3.右側に表示されている英数字を入力
※読めない場合は表示されている英数字をクリックすると変更可
4.英数字を使用しご自身で決めてたものを入力
5. 4で入力したものをもう一度入力
6. 1~5まで入力後、赤丸の「Send」をクリック
7.届いたSMS(ショートメール)を開き6桁の数字を黄色枠に入力
※認証完了まで制限時間があるので、すばらく入力して下さい
8.同意事項にチェックを入れる
9.「Register」をクリック
1. Select "Register With Phone"
2. Select country code, enter cell phone number
3. Enter the alphanumeric characters displayed on the right side
※If you can not read it, you can change it by clicking on the displayed alphanumeric character
4. Use alphanumeric characters and enter what you decided yourself
5. Re-enter what you entered in ④
6. After entering ① ~ ⑤, click "⑥" red circle "Send"
7. Open the received SMS (short mail) and enter the 6 digit number in the yellow frame
※ Since there is a time limit to complete authentication, please input for a while
8. Inspect the agreement matter
9. Click "Register"
もし、正常登録できなかった場合は1時間程経ってから再度登録を行ってください。
登録が完了しましたらログインを行います。
If you can not register normally, please register again after about 1 hour.
Login will be done when registration is completed.
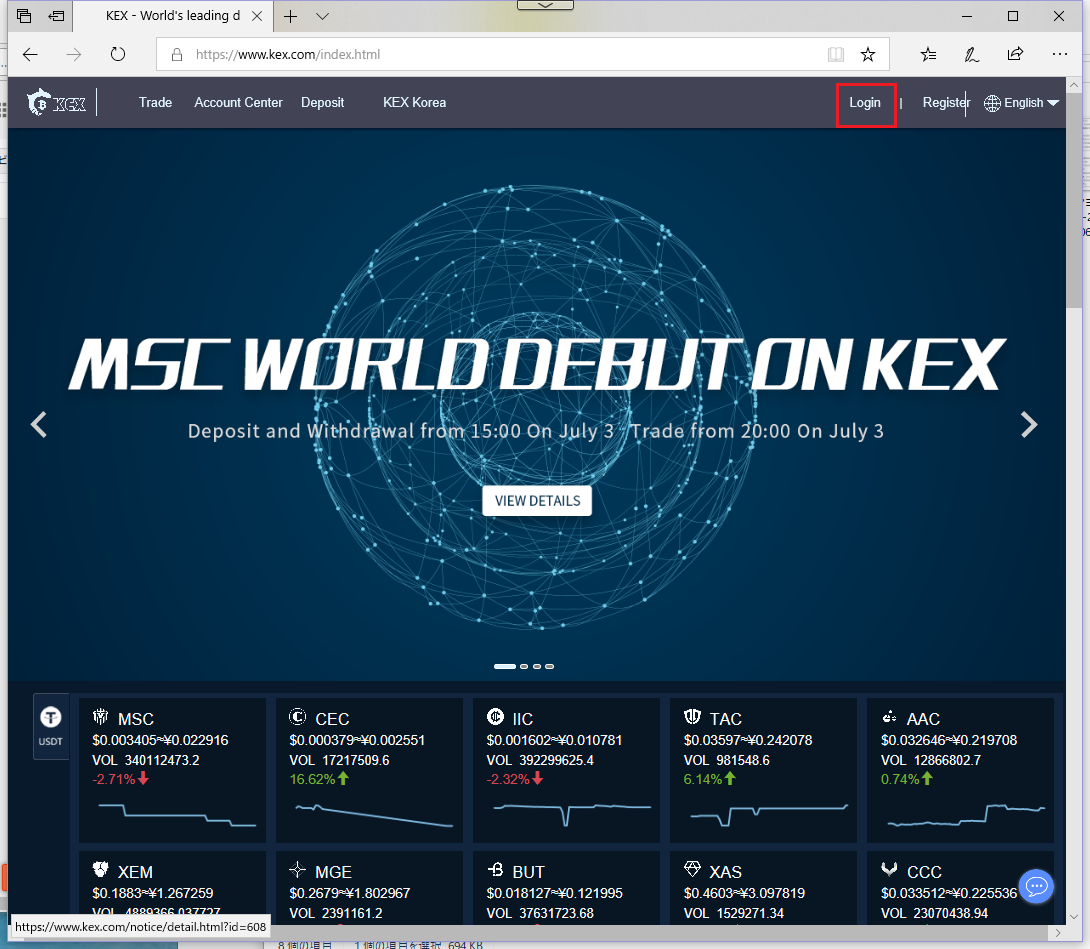
④ログインはトップ画面右上赤枠「Login」をクリック
Login is clicked on "Login" red frame at the top right of the top screen
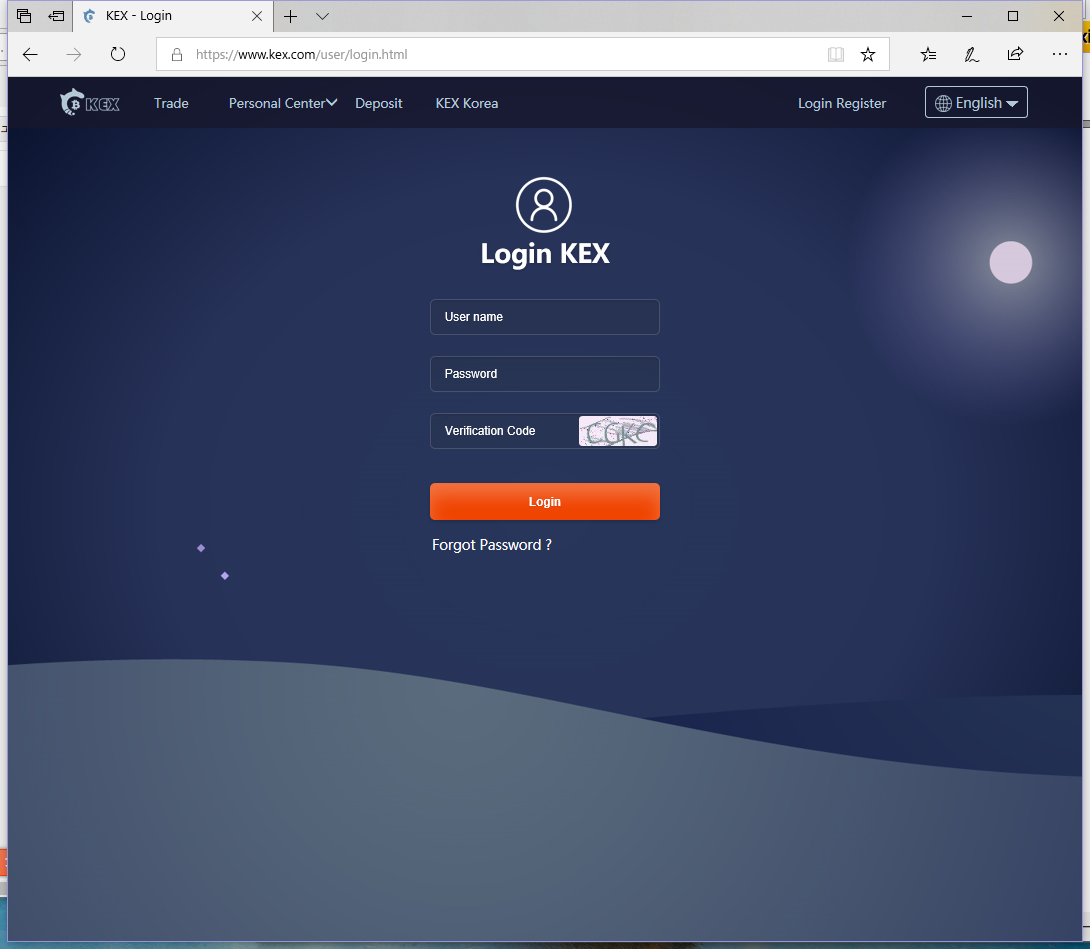
⑤必要事項を入力後、「Login」をクリック
After entering necessary information, click "Login"
・User name:携帯電話番号の方→初めの0をのぞいた10桁の数字
:E-mailの方→登録メールアドレス
・Password:アカウント登録時に入力した英数字
・Verrifcation Code:右側に表示されている英数字を入力
· User name: Mobile phone number → 10 digits except for the initial 0
:E-mail → Registered e-mail address
· Password: Alphanumeric characters entered when registering account
· Verrifcation Code: Enter alphanumeric characters displayed on the right side
ログインが完了しましたら、チャート画面が表示されます。
画面左上にある「KEXロゴマーク」をクリック、トップ画面に戻ります。
When login is completed, the chart screen will be displayed.
Click "KEX logo mark" on the upper left of the screen and return to the top screen.
⑥トップ画面右上に表示されている登録したメールアドレス(携帯電話番号)とIDをクリック
Click on the registered e-mail address (mobile phone number) and ID displayed at the top right of the top screen.
⑦左上のメニューから「Parsonal Center」にマウスを合わせ、「User Center」をクリック
Position the mouse on "Parsonal Center" from the menu in the upper left and click "User Center".
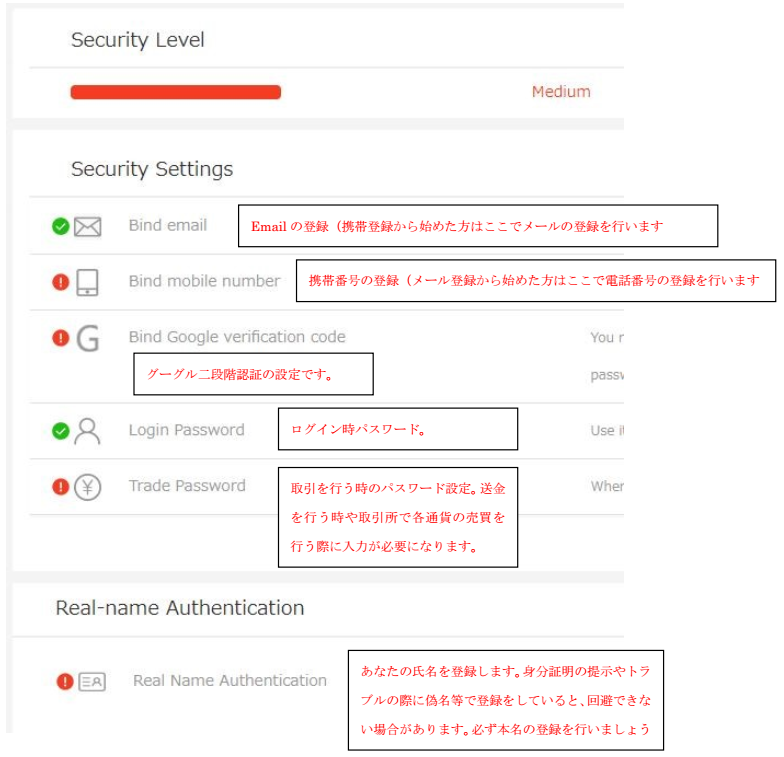
⑧アカウントや取引に関するセキュリティの設定を行います
赤色に表示されている項目は未設定部分ですので、可能な限り全て設定して下さい
We will set up security related to accounts and transactions. Since the items displayed in red are unset parts, please set as much as possible.
※現在確認できている内容では、海外取引所の為一部の日本のプロバイダーから接続が出来ない、ログイン出来ない等の事象があるようです。
ご利用の回線で上手くいかない場合は、別のネット環境からお試し下さい。
※It seems that there are events such as not being able to connect from some Japanese providers, login impossible etc, because of the overseas exchanges in the contents that can be checked at the moment.
If you are having trouble with your line, please try from another net environment.